Transfer Blendshape
The Starmesh Op. Transfer Blendshape component attempts to create a blendshape on a costume that mimics the movement of a blendshape from another mesh.
Try using this to transfer nail deformations, chest deformations, or hip deformations (i.e. Hip_big) from a base mesh to a costume.
Combine it with other Selectors to limit the areas affected by the transferred deformations.
This component may not always produce good results.
In addition, if you use other tools that attempt to fit a costume on an avatar it was not designed for (i.e. fitting a costume made for Manuka on a Lime base body), it will probably not work as this operator expects the mesh data to overlap, regardless of how bones are arranged in the scene.
Keep in mind that the way fabric deforms is not always analogous to how customization blendshapes deforms the skin. For example, the area between the two breasts is under tension, so you may not get good results if you try to transfer breast blendshapes to a costume.
How to use
The Transfer Blendshape operator is particularly slow to compute. The larger your mesh is, the longer it will take to calculate the blendshape.
It may not always produce good results, if at all.
Create the operator and selectors
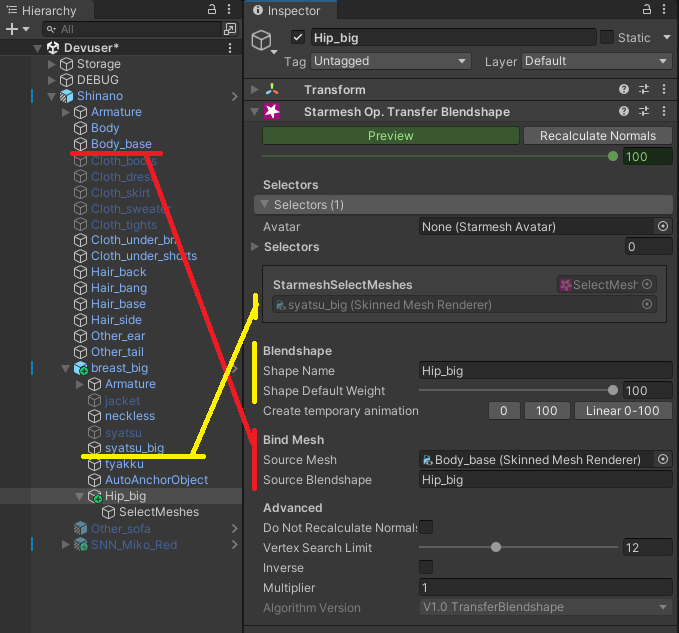
- Add a Starmesh Op. Transfer Blendshape component on a new GameObject in your avatar.
- In the selectors of this component, add a Starmesh Select Meshes, or choose one that you already have.
- Configure the Select Meshes selector so that it affects the relevant meshes.
- You can further restrict the area where the blendshape will be applied. For example, you may want deformations applied to a skirt to only
apply on the hip area.
- If you choose to do so, then, add other selectors, for instance, a Starmesh Select Line Radius.
Configure the operator
- In the Operator, choose the Source Mesh to bind from.
- The mesh to bind from is typically the mesh that contains the skin of your torso.
- Define the Source Blendshape name that will be transferred; it could be the same as the one in your source mesh.
- Choose a name for the generated blendshape in the Shape Name.
- The Shape Default Weight setting is the default value of the blendshape on your SkinnedMeshRenderer component after it is created.
- By default, the default weight is set to 100.
- You may want to set that weight to the value your blendshape currently is on the Source Mesh.

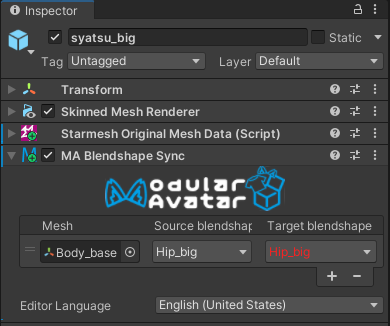
- If you use Modular Avatar and your blendshape is animated, consider adding a Modular Avatar Blendshape Sync if you deem it necessary.
- The target blendshape will displayed in red, but this is fine as long as you use the same blendshape name, and that you make sure the value of Shape Default Weight is the same as the one on your base mesh.

More examples
You can refine the affected area by using additional Selectors.
Advanced
Vertex Search Limit
By default, the algorithm works by finding the closest face to each vertex, but this search is limited to the triangles associated with the closest 12 vertices.
You may choose to increase or decrease the search limit and see how it affects the quality of the transfer.
Inverse
If Inverse is checked, the selected meshes will bind to the source mesh as if the blendshape was applied in the source mesh, and the generated blendshape will be the inverse.
For example, this might be used to create a flat chest blendshape on a costume that was designed to only support larger chests; but the results may vary.
Keep in mind that the way fabric deforms is not always analogous to how customization blendshapes deforms the skin. For example, the area between the two breasts is under tension, so you may not get good results if you try to transfer breast blendshapes to a costume.
Multiplier
You can multiply the effect of the transferred blendshape beyond its intended value, by setting the Multiply value to any value greater than 1, such as 1.2
For values between 0.0 and 1.0, you should use Shape Default Weight instead.
Recalculate Normals
By default, normals will be automatically recalculated for this blendshape.
In general, you should recalculate normals. If you find a reason not to, then check Do Not Recalculate Normals to disable it.
Versions
- 1.7.0: Added.