Lightbox Viewer
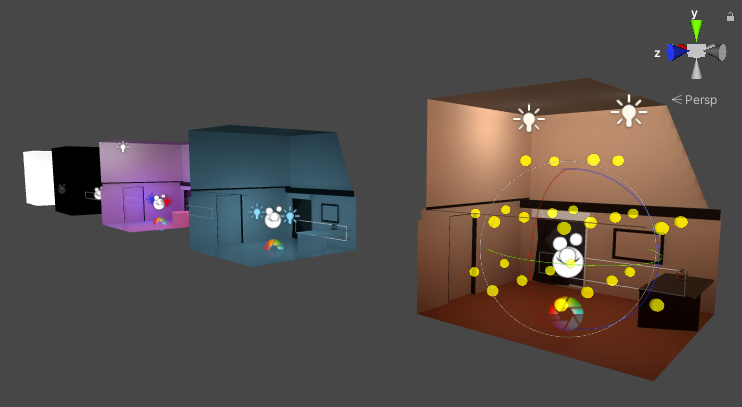
Lightbox Viewer lets you simultaneously visualize changes in shader material settings under different lighting conditions.
- It has been tested to work on Unity 2019, Unity 2022, and Unity 6, and should work on newer versions.
- It is confirmed to work in 💬 VRChatand🔺 Basisprojects. Other applications may be compatible.
Download
The tool is free to download. It can also be downloaded using ALCOM.
Direct download
- GitHub (hai-vr/lightbox-viewer)
ALCOM
- Use this link to install our listing to ALCOM.
- Add Haï ~ Lightbox Viewer to your project using ALCOM.
How to use
Testing materials with Lightbox Viewer
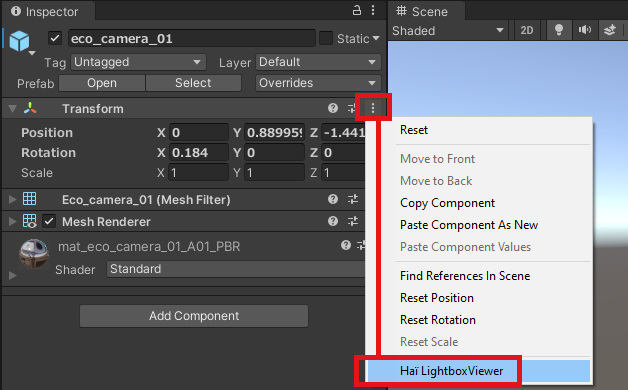
To begin, choose an object, and click the three vertical dots ⋮ next to the Transform component, and select Haï LightboxViewer.

Then, press Activate LightboxViewer. You can now move the scene camera to reframe, move the object around, and do your lighting tests live.
While this mode is active, the editor may slow down. Press Activate LightboxViewer again when not in use to improve the performance of the editor.
Testing in Play mode
Lightbox Viewer can be used in Play mode. Press Activate LightboxViewer before entering Play mode.
Thanks to my Patreon supporters for making tool creation sustainable ⭐
If you find success in using my free tools, visit my Patreon to support the creation of these tools.
You'll also get additional tools as Patreon rewards.
Post Processing
If Post Processing is not installed, you can press Install Post-processing. This lets you test color grading, bloom, and other effects.
Use the Post Processing checkbox to turn it on and off.
Lifting small objects off the ground
When testing small objects, they may appear inside the ground. Press Advanced, and change the Vertical Displacement slider to lift it off the ground.

Switch between collections of lightboxes
This feature has been added in V2.4.0.
On the left, there is a section named Collections. You may use this to select between different sets of lightboxes to test with.
Advanced usage
Camera roll
Camera Roll lets you roll the camera. This can be used to test how some shaders behave. Specifically, some matcap shaders can look strange in VR when tilting the head sideways.
By default, the Counter-rotate option is enabled, which keeps the preview upright despite the camera rolling.
Press Reset to restore the view upright.
Custom camera settings
If you need to tweak the camera settings (such as MSAA, HDR, ...), you can select a reference camera in Advanced > Reference Camera.
This will use most camera settings including the near and far clip plane. The scene camera continues to control the camera.
Realign after object movement
During operation, you can click Advanced > Realign to center the lightboxes back to your object after it has moved around.
Support Depth Texture
This feature has been added in V2.4.0.
Some shaders like Poiyomi SSAO need a special prefab to operate.
You can enable Advanced > Support Depth Texture to ensure these shader features can operate.
Mute Lights Inside Object
This feature has been added in V2.4.0.
Lights inside your object can interfere with the look of the lightboxes.
If you enable Advanced > Mute Lights Inside Object, the previews will temporarily turn the lights inside your object off for rendering the lightboxes.
Light Volumes
This feature has been added in V2.3.0.
If the Light Volumes package (0.7.2 or above) is installed in the project, the lightboxes will support light volumes.
If you want to test without light volumes, you have two options:
- in the Lightbox Scene field, select the scene called
Lightboxinstead of the scene calledLightboxLightVolumes, or - after activating Lightbox Viewer, look inside the Lightbox scene. There are dormant lightboxes with
NoLVin their name, but they are tagged EditorOnly so they will not be rendered. Remove the EditorOnly tag from these lightboxes, and you will be able to preview side by side with and without light volumes.
Create your own lightbox scene
Lightbox Viewer is shipped with some default lightboxes that you can test your content with.
These lightboxes are contained in a scene called Lightbox.unity. You can select a different lightbox scene by creating one, or importing one created by someone else.
How it works
A lightbox scene is just a series of meshes put side by side with different lighting settings and post-processing settings.

In a lightbox scene, each lightbox is defined in an object in the root called Lightboxes. The position and rotation of the lightbox is used to determine where to place the object inside that lightbox.
Each lightbox can contain objects that are only enabled when taking a picture of that lightbox.
In particular, this affects real-time lights and post-processing settings. By putting these objects inside a lightbox, you can ensure that they are only enabled when taking a picture of that lightbox.
You don't need to put meshes, light probes, or reflection probes inside the Lightboxes hierarchy, but you can. The default lightbox scene has all the meshes and baked data defined outside the Lightboxes hierarchy.
When creating a lightbox scene, the same discipline as creating a world applies:
- Set your world meshes static Contribute GI and Reflection Probe Static.
- Make sure your world meshes has lightmaps UVs.
- Mark your lights as Baked, unless you want to test for real time lighting.
- Place reflection probes and light probes.
- Bake your scene lighting and reflection probes.
Full mode of operation
When activating LightboxViewer, the following happens:
- The lightbox scene is loaded as an additive scene on top of the current scene.
- Light probes are re-applied (tetrahedralized).
When capturing lightboxes, the following happens:
- If there is a reference camera in the Advanced settings, this camera is temporaily copied, otherwise a new one is temporaily created.
- The camera copies the scene camera settings.
- If there is a camera in the Advanced settings, the near and far clip plane are copied from that reference camera.
- If not, the camera copies the near and far clip plane of the scene camera.
- All light sources in the scene are temporaily disabled, except those in the lightbox scene.
- All reflection probes in the scene are temporaily disabled, except those in the lightbox scene.
- All children of the object called
Lightboxesin the lightbox scene are disabled.
Each child of the object called Lightboxes generates a picture:
- That child lightbox is enabled. This effectively enables anything inside of it that can influence the render, such as real time lights or post-processing volumes.
- The object to be viewed is moved to that lightbox.
- The camera takes a picture.
- That child is disabled again.
If the child is tagged as EditorOnly, it will not be used.
Other
Disable a lightbox
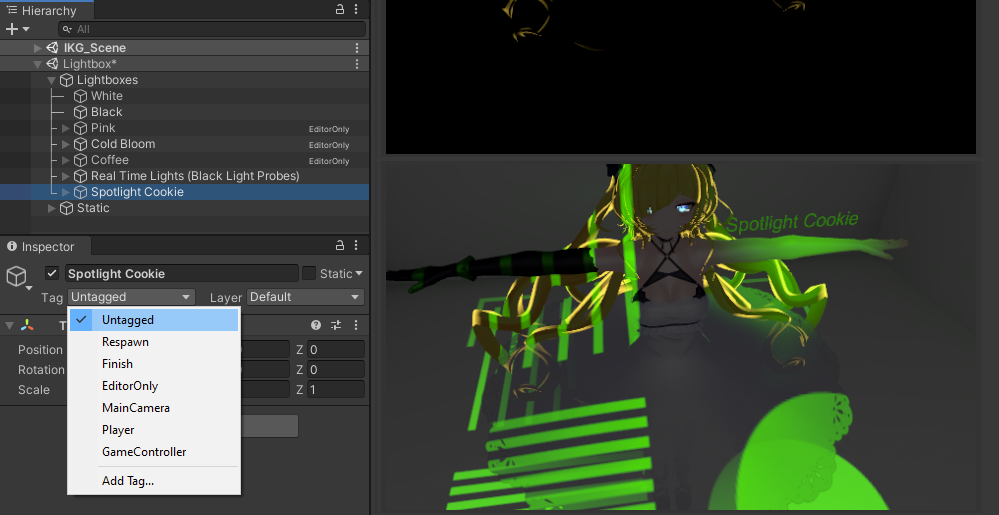
After pressing Activate LightboxViewer, the lightbox scene will show up in at the bottom of the hierarchy.
Expand the Lightboxes object. If you tag one of them as EditorOnly, the lightbox will no longer show up.
Enable a lightbox
Likewise, a lightbox can be enabled by marking it as Untagged. The default lightbox scene contains a hidden lightbox called Spotlight Cookie that you can enable this way.
