Skinned Mesh Constraint Builder
Creates a parent constraint that is weighted to move similarly to the closest polygon of a Skinned Mesh Renderer.
Use this component when you notice that attaching an object to your body is not as straightforward as parenting to a bone.
This does not follow the movement of blendshapes, and does not follow the movement of cloth meshes.
- It has been tested to work on Unity 2020, Unity 2022, and Unity 6, and should work on newer versions.
- It is confirmed to work in VNyan,💬 VRChat, and🔺 Basisprojects. Other applications may be compatible.

Download
The tool is free to download using ALCOM.
ALCOM
- Use this link to install our listing to ALCOM.
- Add Haï ~ Skinned Mesh Constraint to your project using ALCOM.
How to use
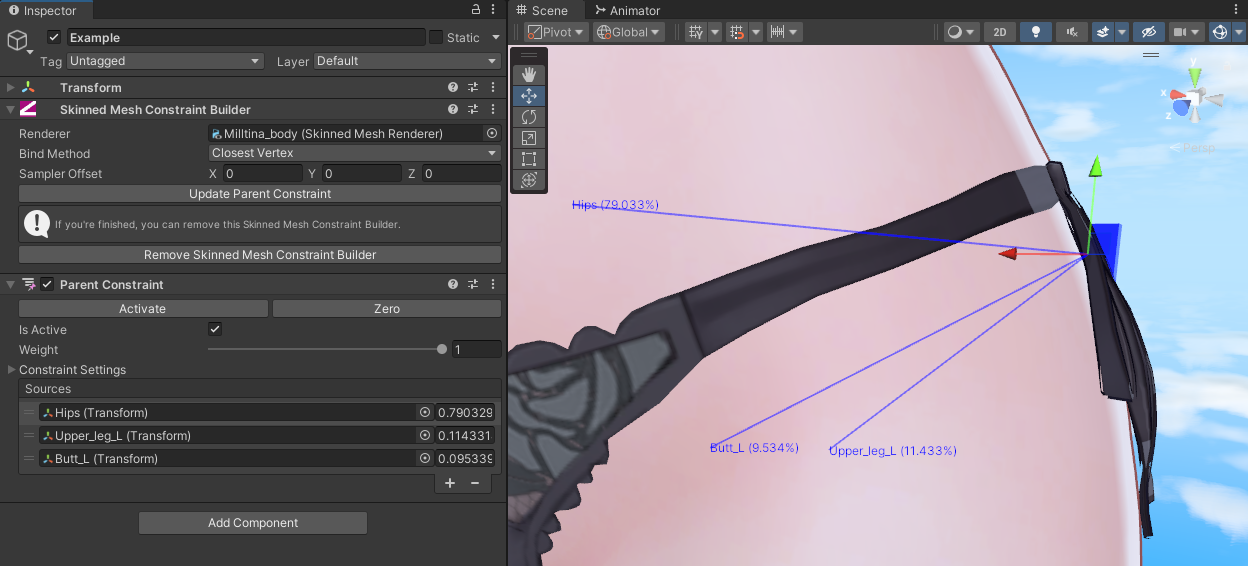
This component generates a parent constraint on the same object as you put the Skinned Mesh Constraint Builder component on.
The parent constraint will be configured to be weight painted in a similar way to the mesh itself, by reusing the bone weights of the closest polygon.
Use this component when you notice that attaching an object to your body is not as straightforward as parenting to a bone.
Thanks to my Patreon supporters for making tool creation sustainable ⭐
If you find success in using my free tools, visit my Patreon to support the creation of these tools.
You'll also get additional tools as Patreon rewards.
To use this component:
- Add a "Skinned Mesh Constraint Builder" component on the GameObject that you want to put a constraint on.
- In the Source Mesh field, select the Skinned Mesh Renderer that contains the polygon you want to attach this object to.
- Ideally, the origin of that object should already be close to the polygon that you want to attach it to.
- If you cannot change the origin of that object, add an offset in the Sampler Offset field to be closer to that face.
- Click the Create Parent Constraint button.
- When finished, you can remove the Skinned Mesh Constraint Builder component, or you can keep it on your avatar for future reference.
- This component has no effect during builds.
Do not press the Activate button on the constraint!
The Skinned Mesh Constraint Builder manually calculates constraint offsets in order to avoid an issue that occurs with the Activate button (Learn more).
🟧 Before 🟦 After
Parenting a GameObject to the Hip bone on this avatar causes an incorrect position after the legs rotate (🟧), because this region of the mesh is weighted to the legs in addition to the hip.
This Parent constraint uses the same bone weights as the closest face, so that it moves like a vertex (🟦).
Optional: Bind Method
By default, the weights of the constraint will sample the bones associated with the three vertices of the closest triangle of the mesh, weighted using barycentric coordinates.
If you want to use the closest vertex instead of the closest face, change Bind Method to Closest Vertex.
The selected triangle or vertex is shown for five seconds when you click Create or Update.
Optional: Vendor
If the
You can override this behaviour by changing the Vendor field to Unity before creating the constraint, so that it creates a Unity Parent Constraint.
Learn more
Versions
- 1.2.0: Fix compatibility with breaking change introduced in VRCSDK 3.10, if it is installed.
- 1.0.1: Added.
Classification: This component is application-agnostic.