Cloth Transfer
Cloth Transfer is a Unity Editor tool that lets you transfer cloth constraints of a mesh from a Unity 2018 project into a Unity 2019 project.
It was created mainly to assist migration from Unity 2018 to Unity 2019 in the VRChat social platform.
This does not require VRChat to run. It has been tested to work on Unity 2018, Unity 2019, Unity 2022.
Download
The tool is free to download.
How to use
You need to have two projects, the first in Unity 2018, the other in Unity 2019 or above.
The Cloth component must be enabled and visible in the scene. Please make sure that the GameObject and its parents are enabled in the hierarchy, and that the Cloth component is enabled.
-
- First, in Unity 2018:
- 1.1) Install Cloth Transfer.
- 1.2) Select your Cloth component.
- 1.3) Click on the cog on the top right of the component and select Haï Cloth Transfer.
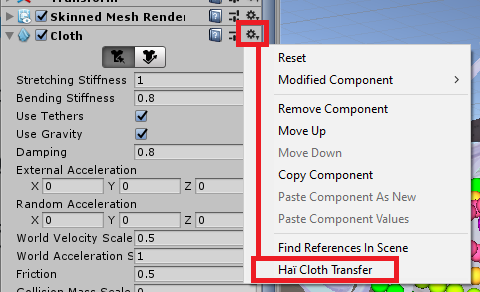
- Warning: If you do not see this menu item, make sure your project does not have compile errors. If your project does have compile errors, it is very important that you do NOT delete the VRChat SDK! Use a backup of your project, or create a new Unity 2018 project and copy the minimum necessary over to proceed.
- 1.4) In the Cloth Transfer window, click Save cloth data button, and choose a location to save the asset.
-
- Then, in Unity 2019:
- 2.1) Install Cloth Transfer.
- 2.2) Copy the asset that you saved earlier from Unity 2018 to Unity 2019 (in step 1.4)
- 2.3) Select your Cloth component.
- 2.4) Click on the three dots on the top right of the component and select Haï Cloth Transfer.
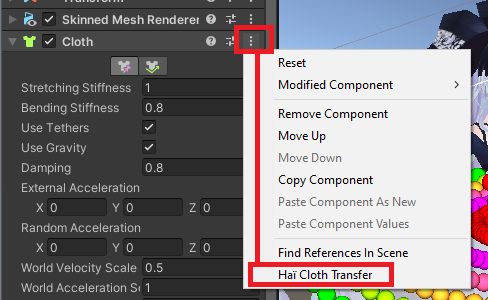
- 2.5) In the Cloth Transfer window, select the copied asset in the Data field.
- 2.6) In the Cloth Transfer window, click on Load cloth data button.
Error tolerance: Allow inexact
Cloth Transfer uses the exact vertex positions to transfer weights. You must use the same mesh, with mesh compression setting set to Off.
Despite this, if the vertex positions end up being different, you can choose to tick the Allow inexact checkbox as a last resort. It will copy the data of the closest vertex whenever it cannot find an exact vertex.
When using Allow inexact, please check that you are copying the data of the correct cloth, and not the data of another cloth by accident!
Additional notes
Cloth Transfer was built specifically to handle cloth constraint migration between Unity 2018 and Unity 2019. It assumes the mesh is identical. If you want to update the mesh data itself after migrating, Cloth Transfer might work using the Allow inexact option; otherwise you can use another tool like CopyComponentsByRegex by Taremin.
- Cloth Transfer only copies the cloth constraints. It does not copy the other data of the cloth component itself.
- Transferring from Unity 2019 back to Unity 2018 is possible by expanding the Other section at the bottom of the Cloth Transfer window. By default, Cloth Transfer will suggest saving data in a Unity 2018 project, and loading data in a Unity 2019 project or above.