2025-05-02 The "Activate" button on Parent Constraint
While developing Skinned Mesh Constraint, I noticed something weird and I wanted to document it somewhere.
Skinned Mesh Constraint is a tool that makes Parent Constraint move the same way as how vertices move from mesh skinning.
Approach #1: Activate constraint targeting the bones
I've always thought that activating a Parent Constraint with the Activate button made the GameObject follow the source transforms using a proportion of their weight, relative to the rest pose.
This is why, when I tried to create my Skinned Mesh Constraint component, my first approach was to collect the painted weights from the mesh, set up the corresponding Parent Constraint sources, and then use reflection to press the Activate button (on a non-VRC project).
However, when moving the bones around, the Parent Constraint would not move the same way as mesh skinning (it overshoots).
Approach #2: Activate constraint targeting new offset transforms located inside the bones
I've then tried to create new transforms inside the bones that are offset to be located in the same position as the Position Constraint at rest.
That approach worked. So somehow I was getting confused about how Parent Constraints work internally. With these observations, I asked for help on two Discord servers.
I've then been told by someone named Sacred that my approach #2 is the correct approach for mesh skinning (Sacred credited someone else called Voxian for that approach, so I've only rediscovered it), and that there is an alternative worse way to do it by using multiple constraints (one parent constraint per bone).
This approach has the advantage of using less constraints, but needs more transform references.
Following this discussion on Discord, this triggered my research for a third approach:
Approach #3: Manually calculate the offset transforms
When clicking the Activate button, the Parent constraint stores information about the relative offsets to the constraint sources at rest.
In Approach #1, these offsets have some value.
In Approach #2, all of these offsets are equal to zero.
In this new approach, I tried to copy the previously created offset transform position and rotations located inside the bones, into these offsets. The constraints are targeting the bones directly instead of those offset transforms.
As it turns out, writing these offsets by hand has fixed the issue. It does not require additional transforms to be referenced, and thus this is the method that I'm using in Skinned Mesh Constraint.
The offsets are calculated using (Quaternion.inverse(sourceTransform.rotation) * constraint.rotation).eulerAngles,
for the rotation and sourceTransform.InverseTransformPoint(constraint.position)
So, what does the Activate button do on constraints?
I don't know how the Activate button works on constraints.
I've tried to visualize what the button does, but this is strange. When clicking Activate, the offset on the leg bones are pointing to unexpected positions.
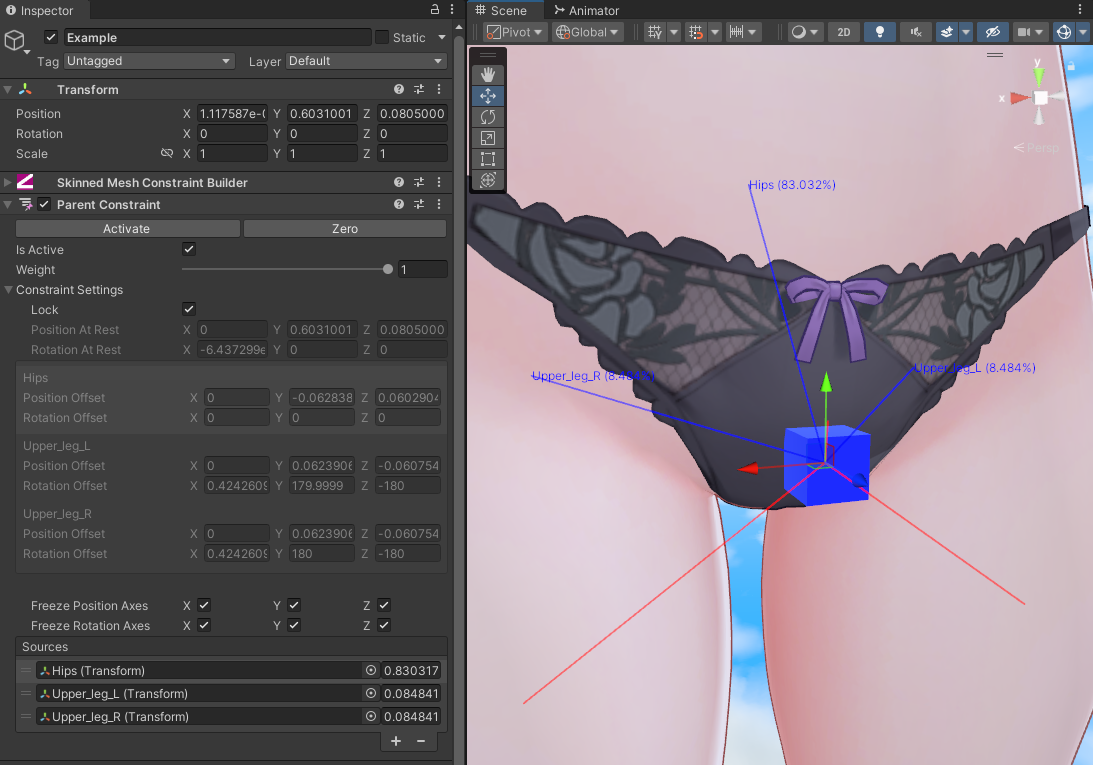
On this picture above, the tip of the red lines are pointing to the world space position of the offsets, but the object being constrained is at rest.
The red lines should not show up at all, because the rest position is the offset, when configuring the Parent Constraint in a way that follows mesh skinning.
I don't know anything more about this, but this means that pressing the Activate button on a constraint results in a different behaviour than
calculating the offsets by hand.
Update 2025-05-03: I have learned new information about how the Activate button works, so this article will later be updated accordingly along with a product update.