Flags
If a control toggles an item that is drawn on top of an item of another control, you may want to hide the other item without switching the other control off.
- That control raises a Flag that the other control listens to.
- Example:
- You can wear a crop-top and a bra/bikini at the same time, and the bra/bikini still remains visible.
- You can wear a sweater and a bra/bikini at the same time, but the bra/bikini is not visible when the sweater is active.
- However, if you take off your sweater, then either the bra or the bikini should show back up.
- Other example: A crop-top and a sweater should change a conflict prevention blendshape of the body.
In this documentation page, we will use two similar terms to describe distinct concepts:
- A control is Switched ON when the user toggles the item on the Menu ON.
- A control is Active when the control is simultaneously Switched ON and additional conditions of the control are satisfied.
When a control is Active, the effects of that control will be visible: Objects will be toggled, properties will change, etc.
It is possible for the user to Switch ON a control without causing any effect to be visible if the additional conditions are not satisfied. Therefore, a control can be Switched ON and still remain Inactive.
What are Flags?
Flags provide an opportunity to handle visibility interactions between items.
- Controls can raise flags as long as they're active.
- Multiple controls can raise the same flag simultaneously.
- The flag is lowered down when no control is raising that flag.
- Other controls can listen to a flag as part of their additional conditions.
- The flag becomes a requirement for that other control to become active.
- There is also a Control mode which only listens to a flag.
- Flags do not switch any control ON or OFF (this is covered in the next section "Ejects").
When to use it?
Flags can be used when the items of a control need to remain inactive while still keeping the control switched ON.
- Example:
- You can wear a crop-top and a bra/bikini at the same time, and the bra/bikini still remains visible.
- You can wear a sweater and a bra/bikini at the same time, but the bra/bikini is not visible when the sweater is active.
- However, if you take off your sweater, then either the bra or the bikini should show back up.
Flags can be used when multiple items change the same properties of a object.
- Example: A crop-top and a sweater should change a conflict prevention blendshape of the body.
How to use
To use flags, first we need to create a Flag, and then we need to assign it to the items that should raise that flag.
- In one of your controls:
- In the Flag panel, type the name of the flag next to the + New flag button. Example of names: NeedsConflictPreventionChest, NeedsConflictPreventionHip, FullyCoversWristWatch, FullyCoversBraStraps, ...
- Press the + New flag button to create a new Vixen Flag asset. This new asset will be highlighted in your project.
- If you have other controls that should raise that flag:
- In the Flag panel, select or drag and drop the previously created Vixen Flag asset into the field.
You can reuse the same Vixen Flag assets across different unrelated avatars.
Example: If you have a Karin and Manuka avatars that need a Hip conflict prevention flag, you can create one NeedsConflictPreventionHip flag and use it for both of your avatars.

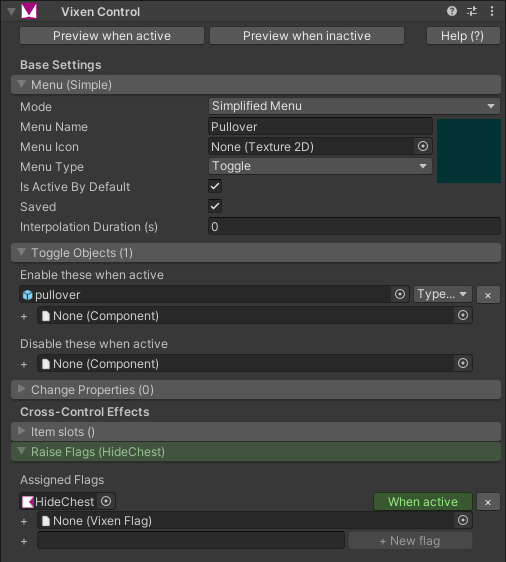
Pictured above: This control raises a flag when the menu is switched ON.
Finally, we need to tell other controls to listen to that flag.
There are several ways, depending on your flag type:
- If you want to create a new control that only listens to that flag, then:
- Create a new Control, and instead of a Menu, set the control mode to Listen To Flag.
- Assign the Flag to that field. Whenever that flag is raised, the control will become active.

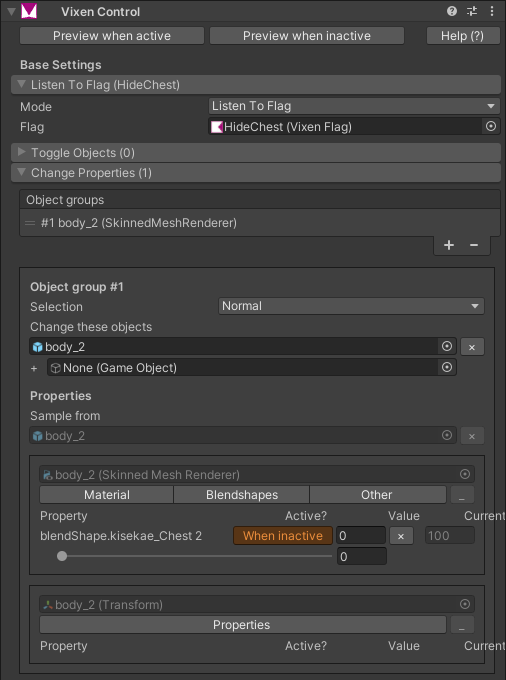
Pictured above: This control listens to a flag, and changes a blendshape if that flag is raised (True).
- If you want to create a new control that listens to multiple flags, then:
- Create a new Control, and instead of a Menu, set the control mode to Conditional.
- Follow the same instructions as above.
- To create an OR condition, create multiple condition groups, with one condition in each group.
- To create an AND condition, create one condition group, and put multiple conditions in it.

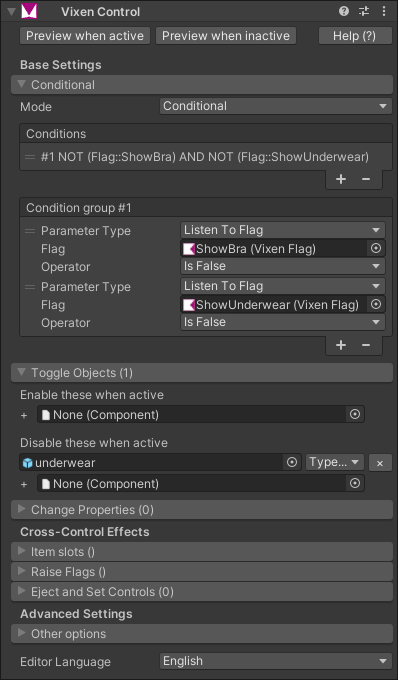
Pictured above: This control listens to two flags, and disables an object if both of those flags are lowered (False).
- If you need an existing control (such as a Menu) to listen to a flag, then:
- In the control that needs to listen to that flag, open the Additional conditions panel in the Advanced section.
- Add a new Condition group.
- In the newly created condition:
- Make sure the Type is set to Listen To Flag.
- Assign the Flag to that field.
- If you want the control to become active when that flag is raised (while the control is switched ON), then make sure the Operator is set to Is True.
- If you want the control to become or remain inactive when that flag is raised (while the control is switched ON), then set the Operator to Is False.

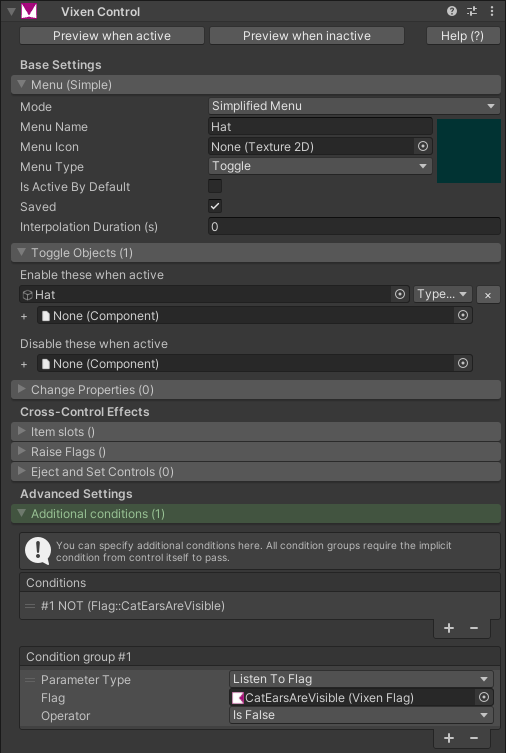
Pictured above: This control is a Menu, but it also requires a flag to be lowered (False). If both the Menu is switched ON and the flag is lowered, it enables an object.
For performance reasons, please refrain from creating more than 5 conditions within the same control.
In VRChat, Vixen internally uses Blend Tree recursive nesting to create conditions, but Blend Trees have a serious performance impact when recursive nesting is excessively used.