Tailoring
If you have already completed at least one successful FaceTra File for one of your avatar bases, you can use Tailoring to reuse that file with a completely different avatar base.
For example, you can transfer from Karin to Lime, or transfer from Kikyo to Moe.
The Tailoring feature was added in V0.7.0.
Principle
Tailoring works by transferring deformations relative to the Construction Lines of the original avatar base, to the Construction Lines of your new avatar base.
The difference in size of the Construction Lines is taken into account. For example, when the width of the mouth differs greatly between the two avatar bases, the deformations will be scaled accordingly.
When using Tailoring, you only need to:
- specify the Construction Lines of your new avatar base,
- and the blendshapes of your new avatar base.
How to use
Prerequisite: You've completed at least one successful FaceTra File for another avatar
You need to have completed at least one successful FaceTra File for another avatar.
In addition:
- Generally, the size of the face should not matter.
- The general shape of the face should be roughly similar for good results.
- You may be able to transfer shapes between two anime-like avatars that have a different mouth width or head size.
- You may be able to transfer shapes between an anime-like avatar and some kemono avatars.
- You might NOT be able to transfer shapes between an anime-like avatar and a furry avatar that has a snout.
- You might NOT be able to transfer shapes between two furry avatars that have greatly differing facial structures.
Create a FaceTra asset for your new avatar base
In the Project tab, right click in one of the folders, and create a “Hai/FaceTra” asset for your new avatar base.
This will be used to hold the construction lines and the blendshapes of your new avatar base.
Create a component on your new avatar base
In the scene that contains your new avatar base, add a GameObject somewhere on your avatar, and add a “Hai’s FaceTra Shape Creator” component to it.
- Avatar Root: The avatar root of your new avatar base, where the Animator component is located
- Face Mesh: The mesh that contains the face of your new avatar base, which should be called Body.
- Face Tra File: Use the FaceTra asset file that you’ve created for your new avatar base.
- Leave all the rest as is.
Define the construction lines for your new avatar base
Define all the Construction lines for your new avatar base.
Enable Tailoring
After you're done with the construction lines:
- In the Tailoring section, tick the "Use Tailoring" checkbox.
- In the "Adaptive File" field, specify the FaceTra File asset of the other avatar base that you've successfully completed before.
- The contents of the "Adaptive File" will not be modified when you're editing this component.
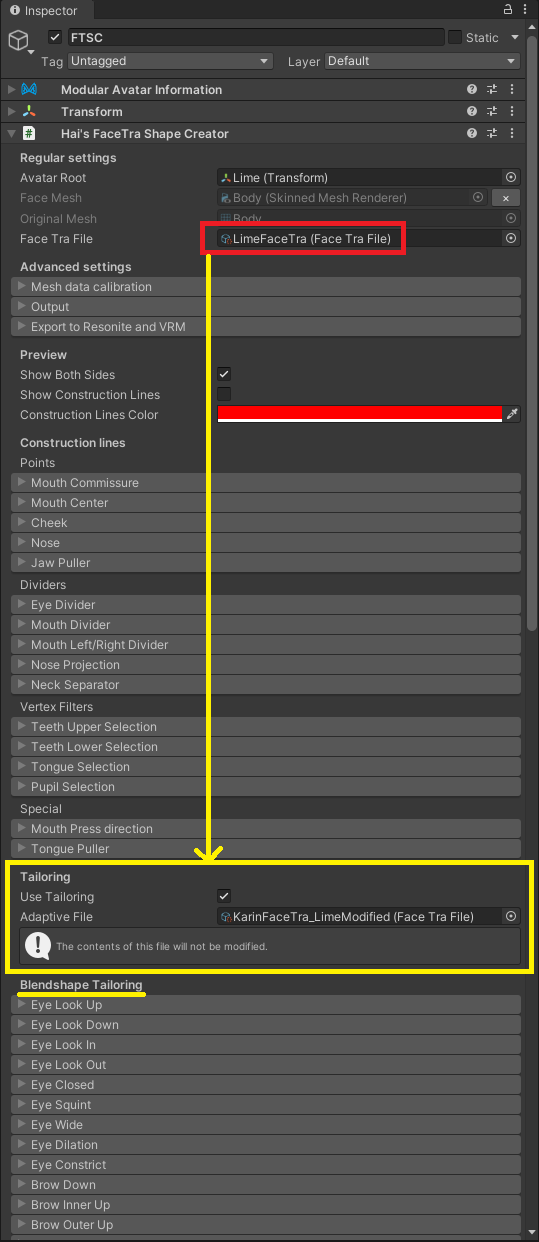
Blendshape Tailoring
The blendshapes of your new avatar base are likely to be different from your other avatar base.
Go through every entry in the "Blendshape Tailoring" section, and setup the corresponding blendshapes for your new avatar base.