Transfer Assistant
- このページは日本語でご覧いただけます: 日本語
- Cette page est disponible en français: Français
- 이 페이지는 한국어로 제공됩니다: 한국어
- 本页面有简体中文版本: 简体中文
- 本頁面有繁體中文版本: 繁體中文
This Unity tool will assist you when you want to use the .unitypackage export function to transfer assets from one project to another project, while stripping assets that you deem unnecessary.
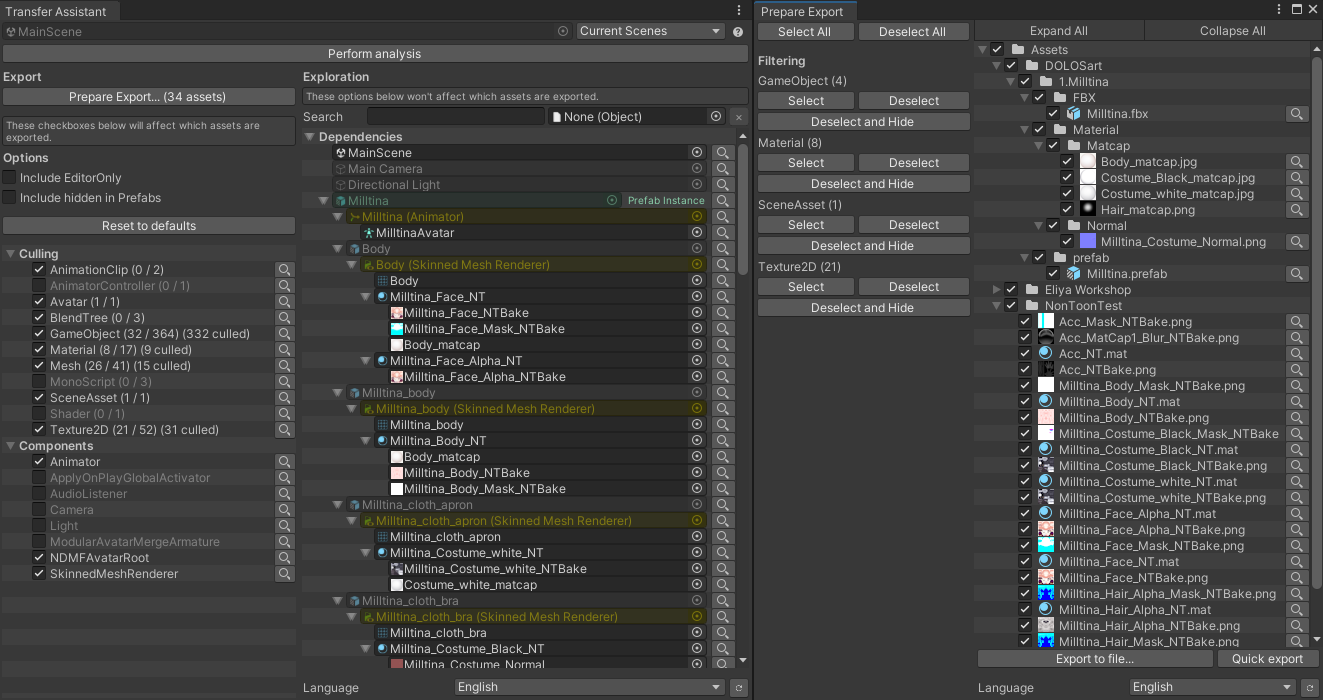
This tool will deliberately ignore some asset references, keeping only assets that you actively need.
- Instead of exporting every asset referenced by prefabs, it only exports assets that exist on the main avatar. If a prefab uses an asset that the main avatar does not, it is not included. This is the default behavior, but it can be changed.
- You may choose to ignore assets by type or by component, along with any asset referenced by them. Examples:
- When you ignore materials, it will also ignore textures used by those materials.
- When you ignore components such as Modular Avatar Menu Item, it will also ignore the icon textures referenced by those components.
- You may choose to ignore assets referenced by objects marked as EditorOnly.
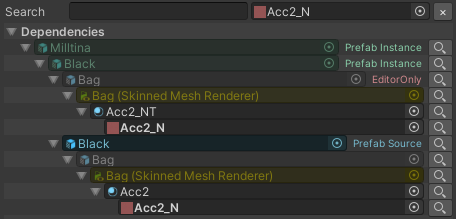
If an unexpected asset is being included in the export, the Transfer Assistant user interface can help you locate which object or component depends on it.
Transfer Assistant will never modify the contents of Scenes or Prefabs.
The intended use for this tool is to export an avatar project file between different games, e.g., from a Unity 2022 BIRP project to a standalone Unity 6.4 URP project. In such a project, assets are scattered across multiple folders, and within those folders, there are assets that you want to exclude because they serve no purpose in the destination project, such as animator controllers or animation files.
What this tool is NOT designed for
If you are a product creator, this tool is not designed for exporting .unitypackage files meant to be published and distributed as part of a release, as such assets typically need more rigorous discipline in the folder structure. Some functionality of this tool may be used for introspection purposes, but it is not recommended to use this tool for the management of product releases.
Download
This tool can be downloaded on Booth.pm.
It can also be installed through ALCOM:
- Use this link to install our listing to ALCOM.
- Add Haï ~ Transfer Assistant to your project using ALCOM.
If you find success in using my free tools, visit my Patreon to support the creation of these tools.
You'll also get additional tools as Patreon rewards.
How to use
These are the basic steps in how to use the tool:
- Choose which assets to analyze.
- Narrow down which asset references you want to keep.
- Explore which assets require other assets.
- Prepare export to preview which asset files will be exported.
- Find out why unexpected asset files are required.
- Export the selected assets.
Choose which assets to analyze
To begin, choose one of the following:
Analyze a prefab
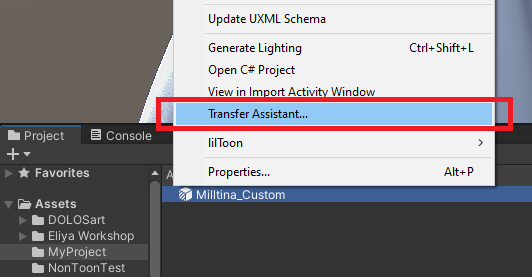
In the Project tab, right-click a prefab and choose Transfer Assistant...
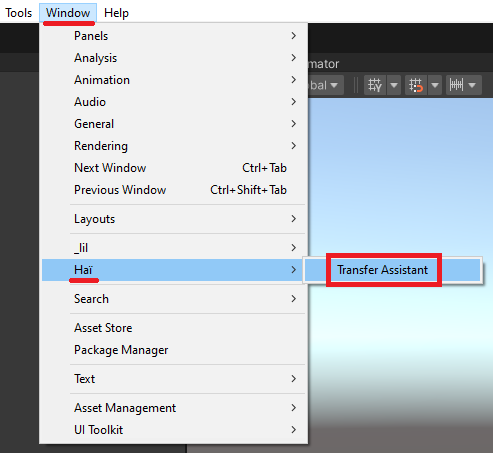
Alternatively, you can go to Window > Haï~ > Transfer Assistant, then choose a prefab, and click the Perform analysis button.
If you're working on an avatar, you should select the prefab in the Project view that contains your avatar.
Analyze a scene
To analyze the objects contained within a scene, you must:
- Open the scene in the Unity Editor.
- Go to Window > Haï~ > Transfer Assistant.
- If necessary, change the window language using the instructions from the next section.
- Set the dropdown on the top right to Current Scenes.
- Click the Perform analysis button.

Additional details
The dropdown on the top right lets you switch between different object selection modes.
- Single Target: Only one root object is analyzed.
- Multiple Targets: Multiple root objects are analyzed.
- Current Scenes: All root objects of the opened scene are analyzed, and the scene itself is added for export.
- This does not include render settings from the scenes. Skybox, lighting data, and other scene references won't be included in the export.
- If you have multiple scenes open, they will all be analyzed.
If you decide to change the target, or if you make modifications to any of the assets, click the Perform analysis button to refresh the contents.
Change the window language
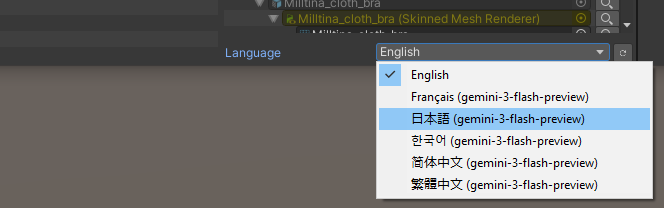
You may change the language using the dropdown at the bottom of the window, which says the word "Language" written in English.
If your language is not available, but you are technically inclined, you can:
- ask a large language model to translate the
Packages/dev.hai-vr.transfer-assistant/Scripts/Editor/Locale/en.jsonfile into a new.jsonfile, - then press
CTRL-Rin the Unity Editor window, - then press the refresh button located to the right of the Language selection dropdown.
Narrow down which asset references you want to keep
Press the checkboxes in the sidebar on the left to affect which assets will get exported.
These checkboxes have a cascading effect; for example, unchecking Materials will affect which Textures get exported.
Transfer Assistant never modifies prefabs nor scenes, so it is always safe to click any of the buttons.
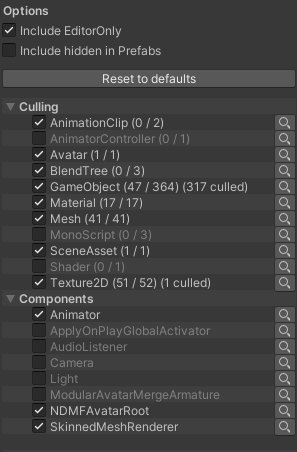
Include EditorOnly
- When checked, all objects are included. This is the default option.
- When unchecked, assets referenced inside EditorOnly objects and any of their children are not included.
- However, to avoid errors during import, prefab sources are always included, even if the prefab instance is EditorOnly.
This does not remove the GameObjects or Components marked as EditorOnly from the prefab, even during export; it only ignores the references that they contain.
Whether you want to check or uncheck this depends on your workflow.
Include hidden in Prefabs
This option deals with how overriding a Prefab instance hides the assets inside the source Prefab.
- When checked, assets referenced within source Prefabs are included, even if your target object does not use it in its hierarchy because it overrides it.
- When unchecked, assets referenced within source Prefabs are not included, so that the only assets that are included are those that your target object actively uses. This is the default option.
- This is the recommended option for avatar-like projects as you are often only interested in what is actively being used on your avatar.
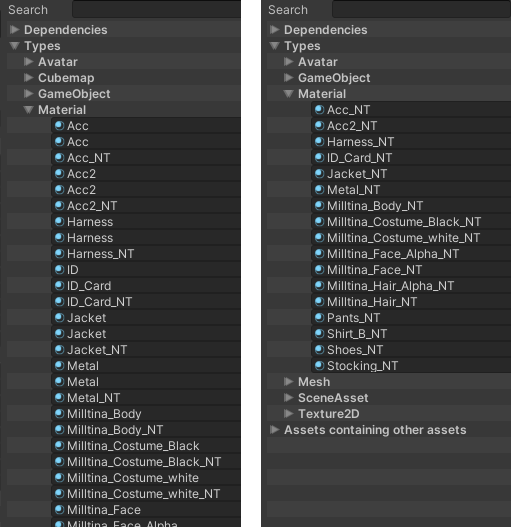
By default, Include hidden in Prefabs is left unchecked. Leaving it unchecked will sometimes lead to a drastically smaller number of assets exported.
In this example, an avatar was modified by converting the materials to NonToon.
- The prefab source still references the previous materials before conversion, despite the avatar not actively using those materials.
- By leaving Include hidden in Prefabs unchecked, those older materials are not included for the export, leaving only the NonToon materials included.
Culling
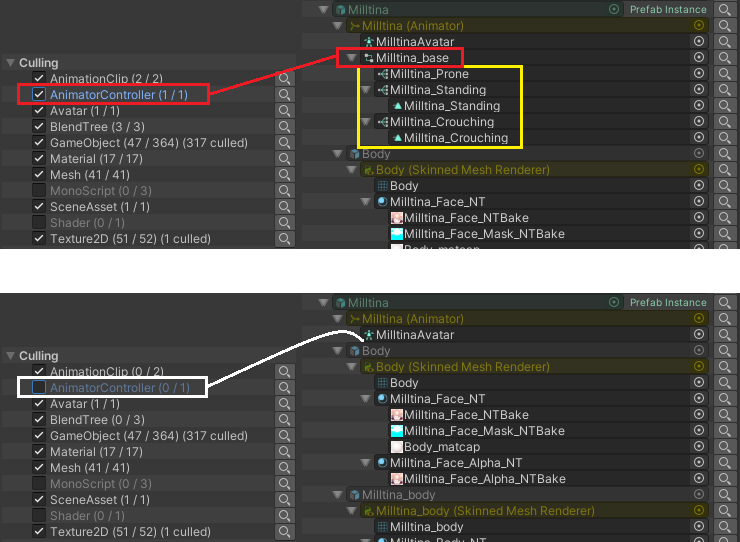
- When checking an asset type, those asset types are included, and any other asset referenced by those asset types is included.
- When unchecking an asset type, those asset types are not included, and assets referenced by those asset types are not included.
Unchecking Animator Controller not only removes the Animator Controllers from the export, it also removes the Blend Tree assets and the Animation Clip assets used by those Animator Controllers from the export.
Components
- When checking a component, any asset referenced by those components is included, and any other asset referenced by those assets is included.
- When unchecking a component, assets referenced by those components are not included, and assets referenced by those assets are not included.
This does not remove the Components from the prefab, even during export.
Explore which assets require other assets
The main panel of the Transfer Assistant contains a dependency tree of objects. This tree is displayed in such a way that the roots depend on the children (= the children are what an object depends on).
Many objects like materials or textures are used multiple times, which means they would have multiple parents; you will see that same object multiple times in that tree when that happens.
For brevity, each object only displays its children once; other occurrences will have the text "(Already shown)" added to the right of it.
Click on any object to highlight the location of that object.
Use the following functions to navigate and figure out why some objects are required:
- Press the magnifier icon on a specific object to focus on that object.
Use this to understand which objects it depends on and which objects depend on it. - Press the magnifier icon on the sidebar to focus on those asset types.
Use this to visualize every dependency that requires those asset types. - Type text in the Search field to look for specific asset names.
You can click the magnifier icon again to clear the search.
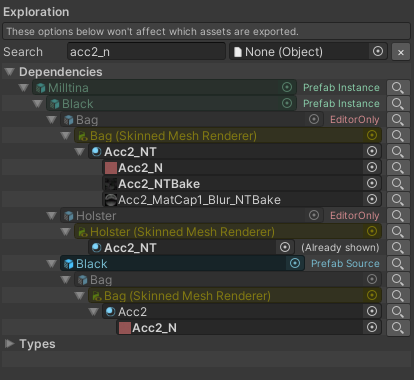
Color coding goes as follows:
- Most objects that are grayed out are not assets, for example, they may be Components or GameObjects that aren't prefabs. Components are shown as grayed-out yellow.
- Objects in blue are Prefab Sources or Prefab Models, which is a prefab asset that exists as a file in the project.
- Objects in green are Prefab Instances, which is a scene object. They may exist in the scene or inside other prefabs.
Prefab Instances often share the same name as the Prefab Source that it depends on, which can be confusing to read. That's why they are color-coded.
Prepare export to preview which asset files will be exported
In the sidebar, press the Prepare Export... button. This will open a new window which looks similar to the Export .unitypackage window.
In there, you can inspect which files would be exported and refine your selection.
The sidebar of that window has buttons for each asset type. These do not have a cascading effect.
- Select: Selects the assets of this type, which will include them in the export.
- Deselect: Deselects the assets of this type, which will exclude them from the export.
- Deselect and Hide: Deselects the assets of this type and removes them from the Export window.
- Note: Pressing Deselect and Hide will not deselect the assets that are referenced by those assets, so this is different from the Culling option from the Transfer Assistant window.
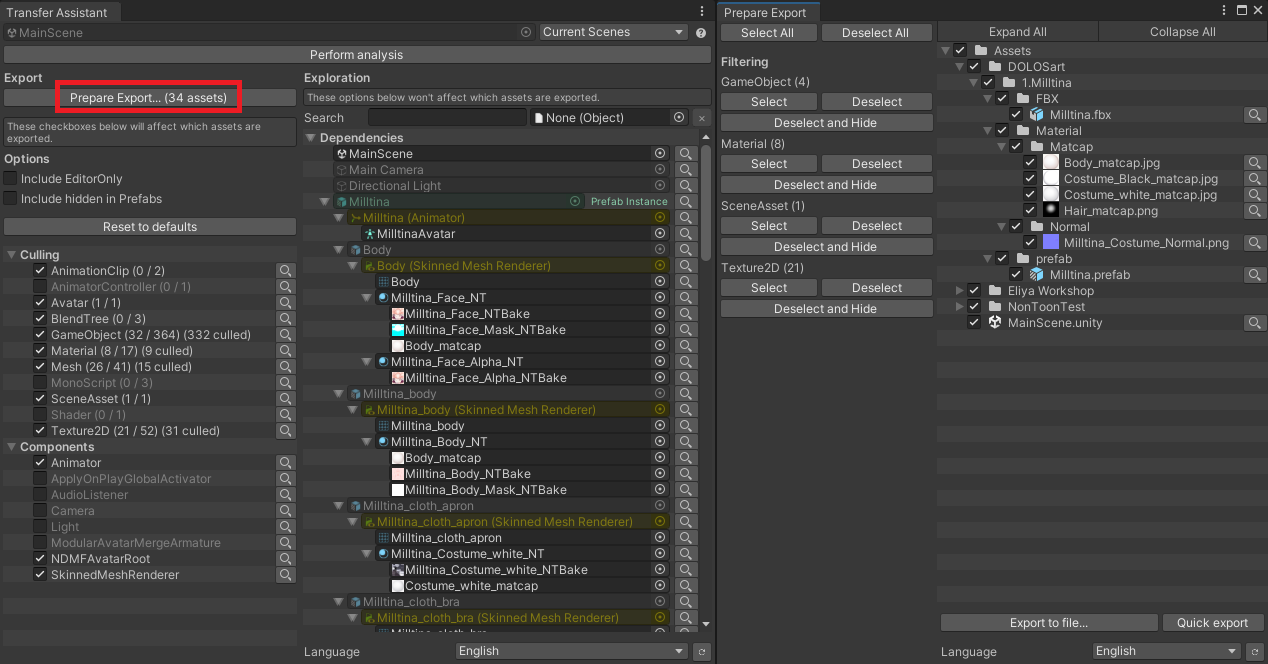
Changes made to the Transfer Assistant window will not be reflected in the Prepare Export window:
If you decide to narrow down or expand your dependencies, you will need to press the Prepare Export... button again.
Find out why unexpected asset files are required
In the Prepare Export window, you may sometimes see files without understanding why they are getting exported.
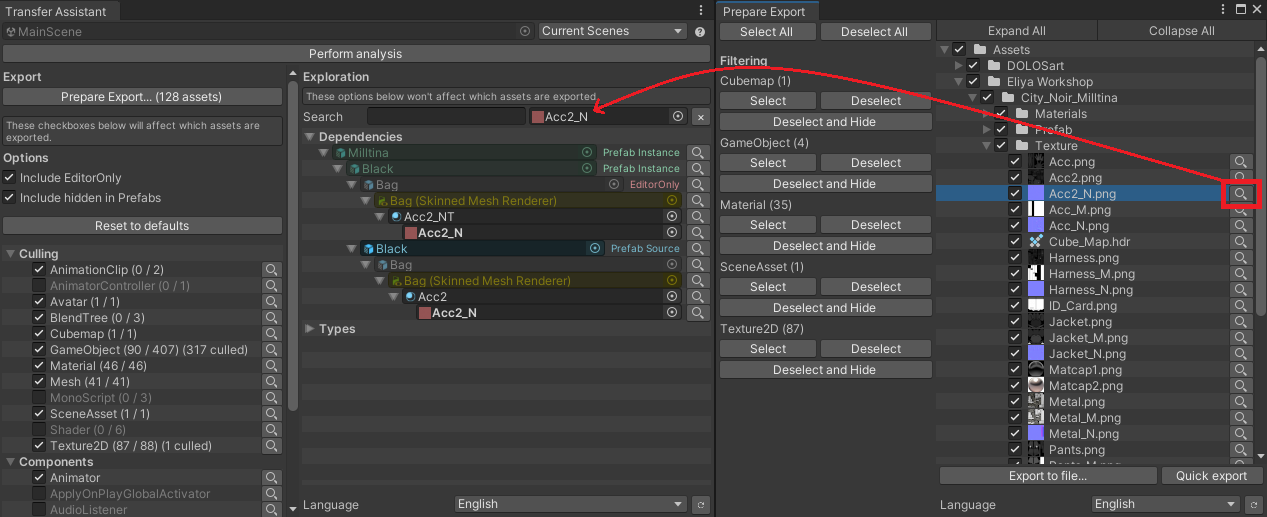
In that case, press the magnifier icon at the right of the Prepare Export window. This will search for that asset inside the Transfer Assistant window.
You can use this information to figure out which object in your hierarchy requires that asset.
You can press the Prepare Export... button even if you have no intention of exporting the files.
Since the Prepare Export window represents your dependencies as files and folders, this is useful information to help locate unexpected assets.
Export the selected assets
Near the bottom of the Prepare Export window, press the Export to file... button to export the selected assets to a file of your choice.
Alternatively, press the Quick Export button to export or overwrite into the export.unitypackage file.